DataMotion Direct can now be accessed from your mobile device to allow you to receive and send secure messages from within the native mail application. This guide will provide step-by-step instructions for configuring and using DataMotion Direct from your mobile device. Your DataMotion Direct email address is probably the same as your primary or corporate email address, and if so your device is already configured to access your primary email account. In order to make it easier to distinguish your primary email account from your DataMotion Direct account, we will use a modified version of your email address for this account. Do not worry; this is not a new email address but a way to distinguish between your primary email account (where you send unsecured email) and your DataMotion Direct account.
Android: Add Your Direct Account
These steps assume you are using the default Android Email app, and that it has not been skinned by the manufacturer. To configure your Android, follow these steps:
- From the Android Home Screen, open the Email app.
- Press the Menu button.

- Select Add Accounts from the menu.

- Select Other from the menu.

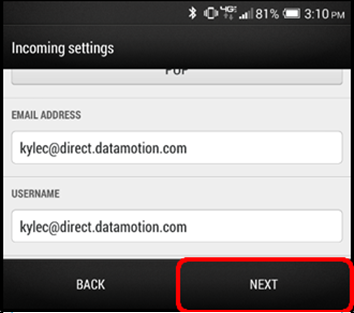
- Enter the following information and click Manual Setup:

Email Address: «your DataMotion Direct messaging address»
Password: Your DataMotion Direct password - For Incoming Server Settings enter the following information:
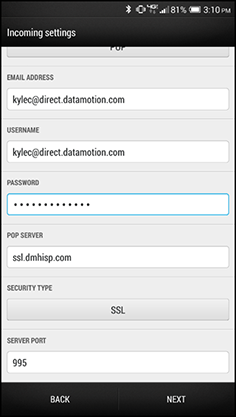
Protocol: POP
Username: “«your DataMotion Direct messaging address»”
Password: Your DataMotion Direct password
POP3 Server: ssl.dmhisp.com
Port: 995 – This will change when you select the correct Security Type
Security Type: SSL – Do not select to “Accept all certificates” - Select Next.
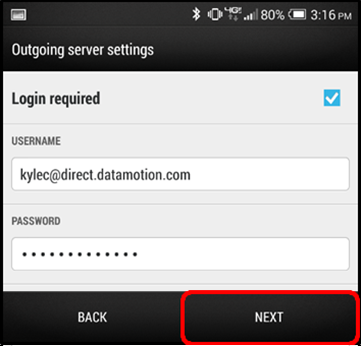
- For Outgoing server settings enter the following information:

SMTP server: ssl.dmhisp.com
Port: 587
Security type: TLS – Do not select to “Accept all certificates”
Require sign-in: Checked
Username: “«your DataMotion Direct messaging address» – this may already be entered
Password: Your DataMotion Direct password – this may already be entered - Select Next.
- Enter a Name for this account to distinguish it from your other accounts and select Finish Setup to complete the set up.
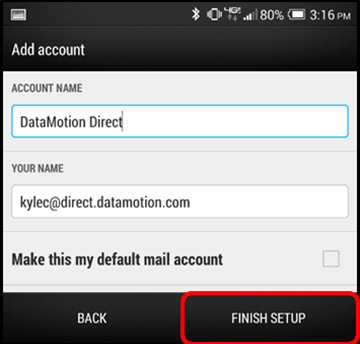
- The account should now be listed in your Accounts list.

Android: Configure Message Deletion
- Select your Direct account from the drop down.
- Press the Menu button and click on Settings.
- Select Sync, Send & Receive.
- Scroll down to the bottom of the page and select the desired setting for Delete mail on server:
- Off: (Default) When you delete messages from your device Inbox, your messages will be retained on the DataMotion Direct server (and web portal) until they expire or you manually delete them there.
- On: When you delete messages from your device Inbox, you’re messages will also be deleted from your Inbox on the DataMotion Direct server and will be placed in the Trash folder. If you don’t delete them from your device, they will be retained on the server until they expire or you manually delete them from the web portal.
iPhone: Add Your Direct Account
- From the iPhone Home Screen, select Settings.

- Select the Mail, Contacts, Calendars option.

- Select the Add Account… option (at the bottom of any Mail Accounts you already have).

- Select Other as the type of account.

- Select the Add Mail Account option under Mail

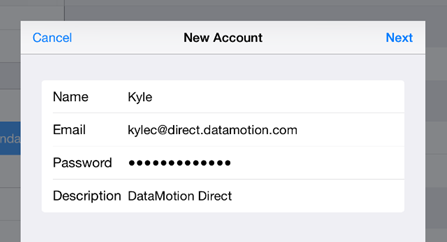
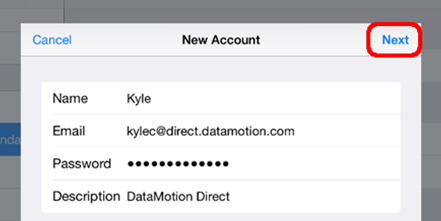
- Enter the following information:
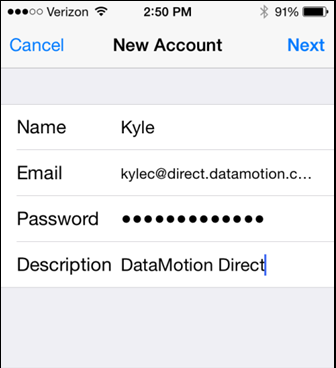
Name: Your name
Address: “«your DataMotion Direct messaging address»”
Password: Your DataMotion Direct password
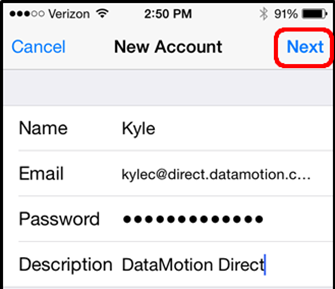
Description: DataMotion Direct - Select Next.
- Select POP. It should be blue once it is selected.
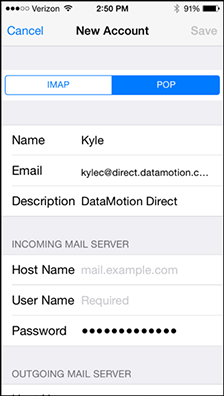
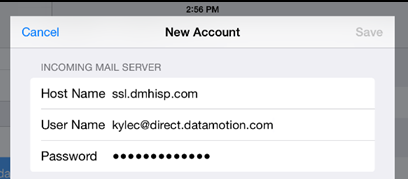
- Under Incoming Mail Server enter the following information:
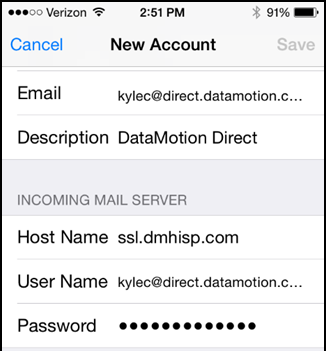
Host Name: ssl.dmhisp.com
User Name: “«your DataMotion Direct messaging address»”
Password: Your DataMotion Direct password - Under Outgoing Mail Server enter the following information:
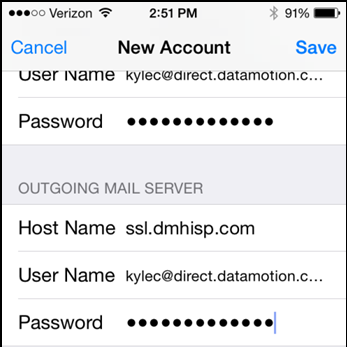
Host Name: ssl.dmhisp.com
User Name: “«your DataMotion Direct messaging address»”
Password: Your DataMotion Direct password - Select Save. The account information will be verified.
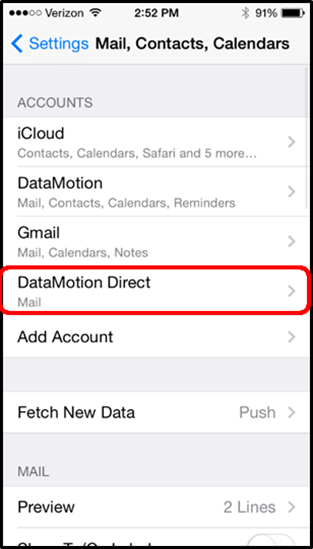
- The account should now be listed in your Accounts list as DataMotion Direct.
iPhone: Configure Message Deletion
To configure this account to delete mail from server follow these steps:
- Press DataMotion Direct
- Scroll down and select SMTP.
- Select Advanced.
- Select a setting for Delete from Server: as follows:
- Never: (Default)- When you delete messages from your device Inbox, your messages will be retained on the DataMotion Direct server (and web portal) until they expire or you manually delete them there.
- When removed from Inbox: When you delete messages from your device Inbox, your messages will also be deleted from your Inbox on the DataMotion Direct server and will be placed in the Trash folder. If you don’t delete them from your device, they will be retained on the server until they expire or you manually delete them using the web portal.
- 7 Days: When you delete messages from your device Inbox, they will be retained in your Inbox on the DataMotion Direct server 7 days, after which they will be placed in the Trash folder. If you don’t delete them from your device, they will be retained on the server until they expire or you manually delete them using the web portal.)
iPad: Add Your Direct Account
- From the iPad Home Screen, select Settings.

- Select the Mail, Contacts, Calendars option.

- Select the Add Account… option (at the bottom of any Mail Accounts you already have).

- Select Other as the type of account.

- Select the Add Mail Account option under Mail.

- Enter the following information:
Name: Your name
Address: “«your DataMotion Direct messaging address»”
Password:Your DataMotion Direct password
Description: DataMotion Direct - Select Next.
- Select POP. It should be blue once it is selected.
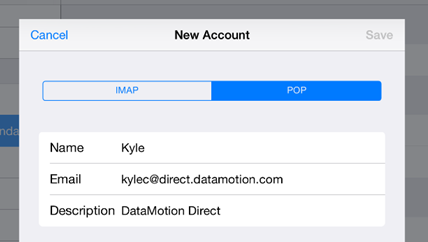
- Under Incoming Mail Server enter the following information:
Host Name: ssl.dmhisp.com
User Name: “«your DataMotion Direct messaging address»”
Password: Your DataMotion Direct password - Under Outgoing Mail Server enter the following information:
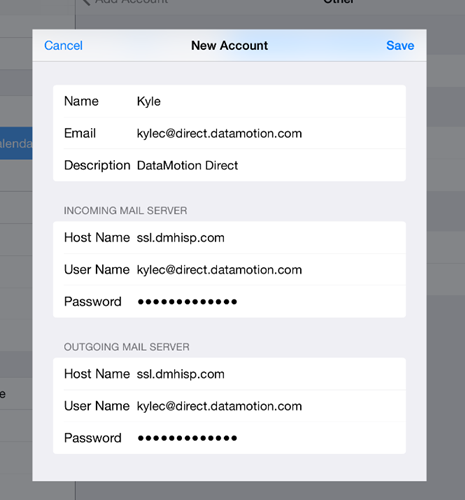
Host Name: ssl.dmhisp.com
User Name: “«your DataMotion Direct messaging address»”
Password: Your DataMotion Direct password - Select Save. The account information will be verified.
- The account should now be listed in your Accounts list as DataMotion Direct.
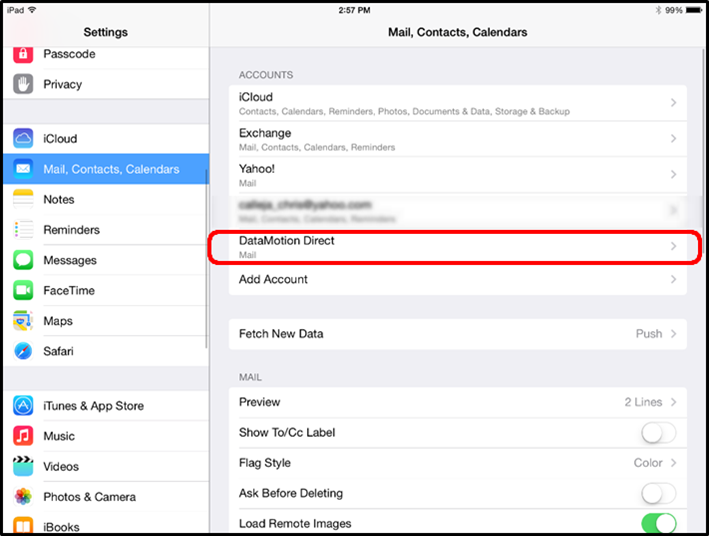
iPad: Configure Message Deletion
To configure this account to delete mail from server follow these steps:
- Press DataMotion Direct
- Scroll down and select SMTP.
- Select Advanced.
- Select a setting for Delete from Server: as follows:
- Never: (Default)- When you delete messages from your device Inbox, your messages will be retained on the DataMotion Direct server (and web portal) until they expire or you manually delete them there.
- When removed from Inbox: When you delete messages from your device Inbox, your messages will also be deleted from your Inbox on the DataMotion Direct server and will be placed in the Trash folder. If you don’t delete them from your device, they will be retained on the server until they expire or you manually delete them using the web portal.
- 7 Days: When you delete messages from your device Inbox, they will be retained in your Inbox on the DataMotion Direct server 7 days, after which they will be placed in the Trash folder. If you don’t delete them from your device, they will be retained on the server until they expire or you manually delete them using the web portal.)