With this guide learn how to integrate your Salesforce instance with SecureMail. Covers what the prerequisites are, steps to perform the integration and setting up email-to-case.
DataMotion SecureMail enables businesses to protect sensitive data and maintain compliance with privacy and security regulations while taking advantage of cloud-based email solutions with all their benefits. With DataMotion SecureMail integration into Salesforce, any Customer Service Representative (CSR) or other employee in a customer-facing role using Salesforce to communicate with customers can safely transmit and receive any email messages throughout their daily workflows. After integrating, it is not even noticeable that DataMotion SecureMail is present on the Salesforce UI that CSRs would be using thanks to all of the integration and transmission is taking place behind the scenes. The term CSR will be used further in this document to represent a customer-facing employee who needs to securely communicate with customers via Salesforce. The following diagram illustrates what a CSR would be seeing after the integration is complete as well as the flow of communication from CSR to customer:
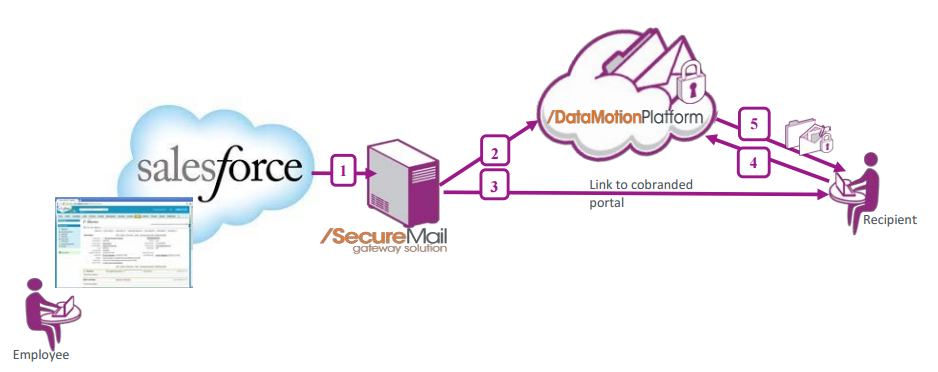
The message flow takes place from left to right with the customer retrieving the secure message as the end result. Delivery via TLS is possible using the Safe TLS feature provided by DataMotion. This allows for a fast delivery time if both parties have and accept TLS connection. With Safe TLS, if the customer receiving the message does not accept TLS delivery, then it is possible for that customer to use the DataMotion SecureMail web portal to retrieve their secure emails from the CSR. While this process is not as fast as accepting TLS delivery, it is no less secure and it also provides a safe way for the customer to reply to the message. This guide provides easy to follow, step-by-step instructions describing the process required to integrate DataMotion SecureMail into Salesforce by setting up the Email Relay functionality through the Salesforce console. In order to enable receiving inbound messages by the CSR in Salesforce, a set of instructions to enable and configure Salesforce Email-to-Case is provided.
Setup Procedures
DataMotion SecureMail can be integrated into almost any Salesforce environment. Built in functionality provided by Salesforce for Email-to-Case and Email Relaying, has made integration much easier than implementations in the past. Thanks to the built in Salesforce features and the Safe TLS feature that has been implemented by DataMotion, overall configuration is relatively simple.
DataMotion Prerequisites
The setup procedures described in this chapter provide the simplest methods available to setup a Salesforce instance to work with DataMotion SecureMail. The following sections highlight a number of prerequisites that must be met on both the Salesforce side and the DataMotion side before proceeding with the rest of the document. DataMotion SecureMail Prerequisites
On the SecureMail side the following requirements should be met before beginning the integration setup process.
- Have a valid DataMotion SecureMail account that is not a recipient address.
- Complete the user registration process for the SecureMail account.
- (Optional) Have on-premise installation of the DataMotion SecureMail Gateway for Email-to-Case feature integration.
SalesForce Prerequisites
In order to set up and configure Email-to-Case and Email Relaying, an appropriate edition of Salesforce itself is required. The following list shows the currently available Salesforce editions that grant access to these settings:
- Professional
- Enterprise
- Performance
- Unlimited
- Developer
Setting Outbound Salesforce Emails to Use DataMotion SecureMail
Setting Up SalesForce Email Relay to Use a DataMotion Server
It is critical to perform this setup in order to enable DataMotion SecureMail for outbound emails from Salesforce to customers. This setup is simpler due to the fact that only a single host name can be entered when setting the host name in step 4 below. An email containing the host name where the SecureMail server resides will be sent by DataMotion Support in advance.
Activating the Email Relay Feature and Routing Outbound E-Mail to DataMotion
In most cases the Email Relay feature will not be active within a Salesforce account for an organization. If it is already active and the user who will be performing these steps is familiar with Email Relay, skip to step 4 below:
-
- Log into the Salesforce account that is used to administer the organization.
- Click the Setup wheel.

- Click Setup.
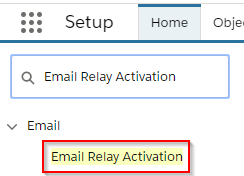
- In the Quick Find bar, search for Email Relay.
- Click Email Relay Activation under the Email drop-down.
- Click Create Email Relay.

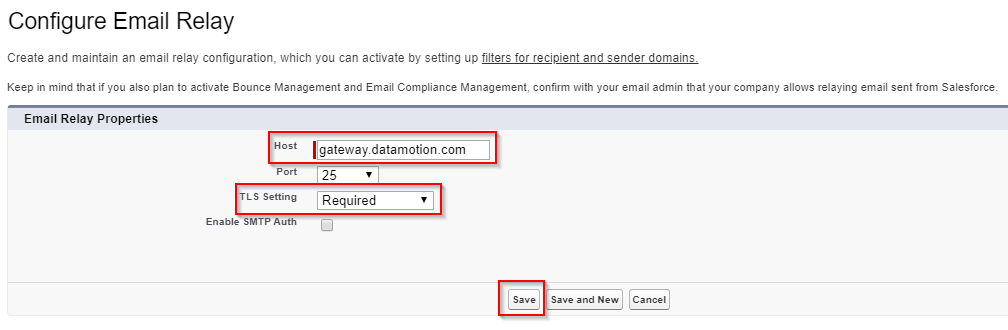
- Enter gateway.datamotion.com in the Email Host field.
- For only the secure outbound setup, select either port 25 or 587 in the Port drop-down. All ports are an option if utilizing your own SecureMail Gateway.
- Set the TLS Setting to Required.
- Click Save to activate the email relay to complete the process.
Using an Email Template to Send Outbound Messages Securely
A method of sending outbound emails from Salesforce using an email template is a simple way to decide whether or not a message will be secure or not. A template will have to be created for this task, however everything about the template can be customized according to the designer’s specifications with the exception of the Subject line. The Subject line must contain a predefined tag named “[Secure: ]” which will allow the SecureMail server to determine that the message should be sent securely. If a message does not need to be sent securely, simply do not select this email template for a response. Please note that the tag can be altered to be whatever you desire if you are utilizing your own SecureMail Gateway.
Allowing Recipients to Respond to Secure Messages Sent to them From SalesForce
In order to enable customers to respond to secure messages send to them via Salesforce, the Email-to-Case feature of Salesforce needs to be configured as described in the section below. This configuration requires that you have purchased and installed your own SecureMail Gateway.
Configure SalesForce to Create Cases based off of Inbound Secure Emails
This information describes how to integrate DataMotion SecureMail with Salesforce in order to create cases for emails that have been sent to Salesforce user accounts via the use of routing addresses. All created cases can be assigned to any Salesforce user during the initial creation process for the routing address. The case owner’s email address in Salesforce does not have to match the email address used for the routing address. Please be aware that the routing address will route all email it receives to a new case unless the email contains the ref id of an existing case thread. This configuration also enables customers to respond to outbound secure messages sent to them from Salesforce.
Setting Up SalesForce Email-to-Case for use with DataMotion SecureMail
Configuring Email-to-Case includes three primary steps that include setting up routing addresses, deciding if On-Demand-Email-to-Case or regular Email-to-Case satisfies the needs of the company, and to test if the configuration works as intended.
Accessing the Email-to-Case Settings
Once it is confirmed that the Salesforce edition supports Email-to-Case (see the Salesforce Prerequisites section for information on which editions of Salesforce have access to these settings) it is possible to begin the integration process. Follow the steps listed below to begin the process.
-
- Log into the Salesforce account that is used to administer the organization.
- Click the Setup wheel.
- Click Setup.
- In the Quick Find bar search for Email-to-Case under Feature Settings -> Service drop down.
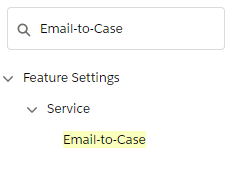
- Click the Email-to-Case link to access the Email-to-Case Setup page.
Configuring the Email-to-Case Settings
Before it is possible to configure any of the settings available on this page, click the Edit button next to the Email-to-Case Settings text.
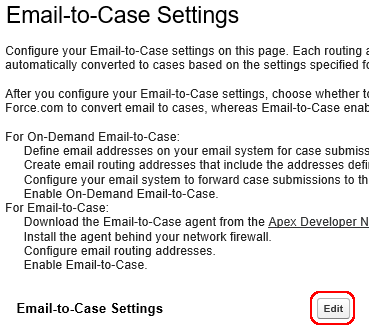
The settings on this page will become editable after the button has been clicked. Some options on this page are configurable and have no bearing on the integration with DataMotion SecureMail. It is possible to change these settings later, but the features that should be enabled during this phase are described in the following steps.
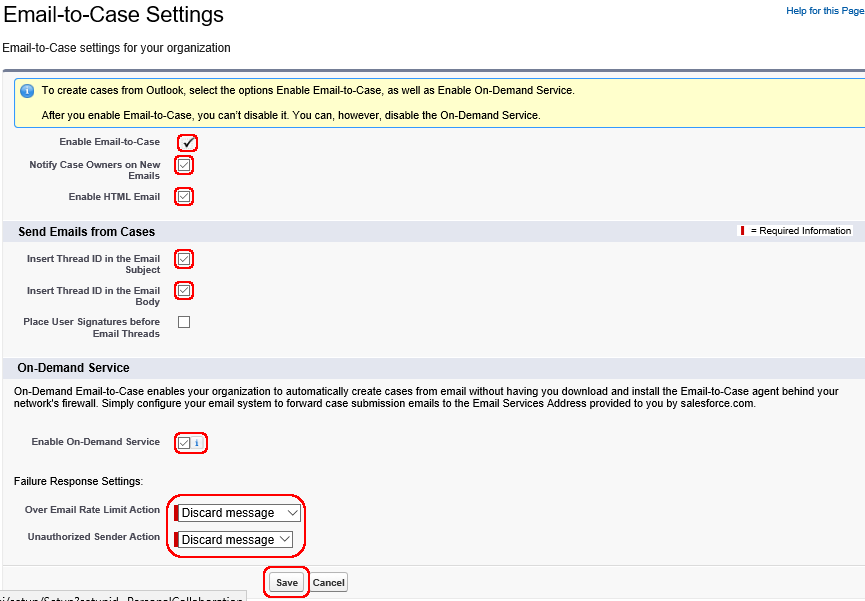
- Click the Enable Email-to-Case checkbox to turn on Email-to-Case. This step must be completed and cannot be undone.
- (Optional) Select Notify Case Owners on New Emails. This feature does not have to be enabled
- (Optional) Enable HTML email. While optional this feature allows for additional formatting of emails from within the Salesforce UI.
- Select either Insert Thread ID in the email Subject or Insert Thread ID in the email Body. Both options can be chosen if desired.
- (Optional) Enable Place User Signatures before Email Threads. This feature is cosmetic and requires setting up user signatures in Salesforce in order to function.
- Select Enable On-Demand Service.
Creating a Routing Address Where Email2Case is the Source
Defining appropriate routing addresses is crucial in order to have emails routed to the appropriate address. Perform the steps below to create a routing address. Unlike having Outlook as the source of the routing address, when Email2Case is used as the source the generated routing address must be included in the Cc field of the email. If it is not included in this way then the email will not be routed at all. These instructions assume that the user is on the Email-to-Case Settings page.
-
- Find the Routing Addresses section and select Email2Case from the drop-down.

- Click New once Email2Case is selected.

- Enter a Routing Name, Email Address, and select the Case Priority and Case Origin.
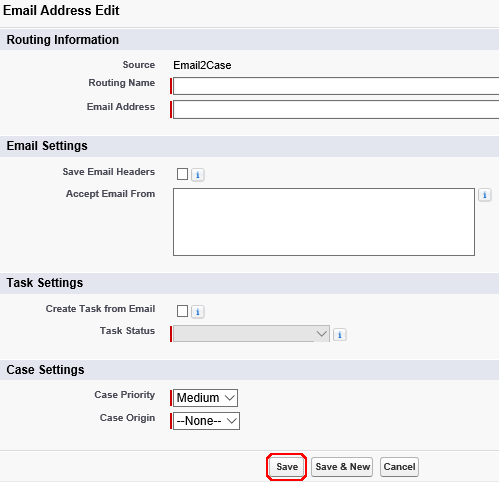
NOTE: It is possible to create a task when setting up a routing address is performed via this method. Click the checkbox Create Task from Email to enable this feature, and set the Task Status. - Click Save and Salesforce will prompt a verification notice stating that an email will be sent to the selected Email Address in order to verify the selection.
- Find the Routing Addresses section and select Email2Case from the drop-down.